Queremos celebrar la llegada de la Primavera con esta entrada dedicada a la flor del almendro.
We want to celebrate the arrival of Spring by making a delicate almond flower.
Es imprescindible dar un paseo por el campo o por vuestro jardín y recoger arbustos o ramas, buscar un jarrón o una cesta y tejer estas bonitas flores de almendro.
Go to the park and take a branch, put it in a vase and make these almond flowers.
Todos los materiales utilizados están en casa. Dependiendo del hilo utilizado, no es imprescindible endurecer las flores.
All materials can be found at home. If the yarn is strong then it is not necessary to harden.

TUTORIAL PARA LA FLOR DE ALMENDRO / ALMOND FLOWER TUTORIAL
GRADO DE DIFICULTAD
Medio
MATERIALES
Hilo de algodón
Aguja en función del grosor del hilo elegido.
PUNTOS DE CROCHET UTILIZADOS
- Cadeneta (c.a.d.)
- Anillo mágico
- Punto alto (p.a.)
- Punto alto doble (p.a.d)
- Punto alto triple (p.a.tr.)
- Punto alto cuádruple (p.a.cuád.)
DIFICULTY
Medium
MATERIALS
Cotton and hook
STITCHES USED
- Chain stitch (ch)
- Magic circle
- Double crochet (dc)
- Treble crochet (tb)
- Double treble (dtb)
- Triple treble
TUTORIAL PARA LA FLOR DE ALMENDRO BÁSICA / BASIC ALMOND FLOWER TUTORIAL
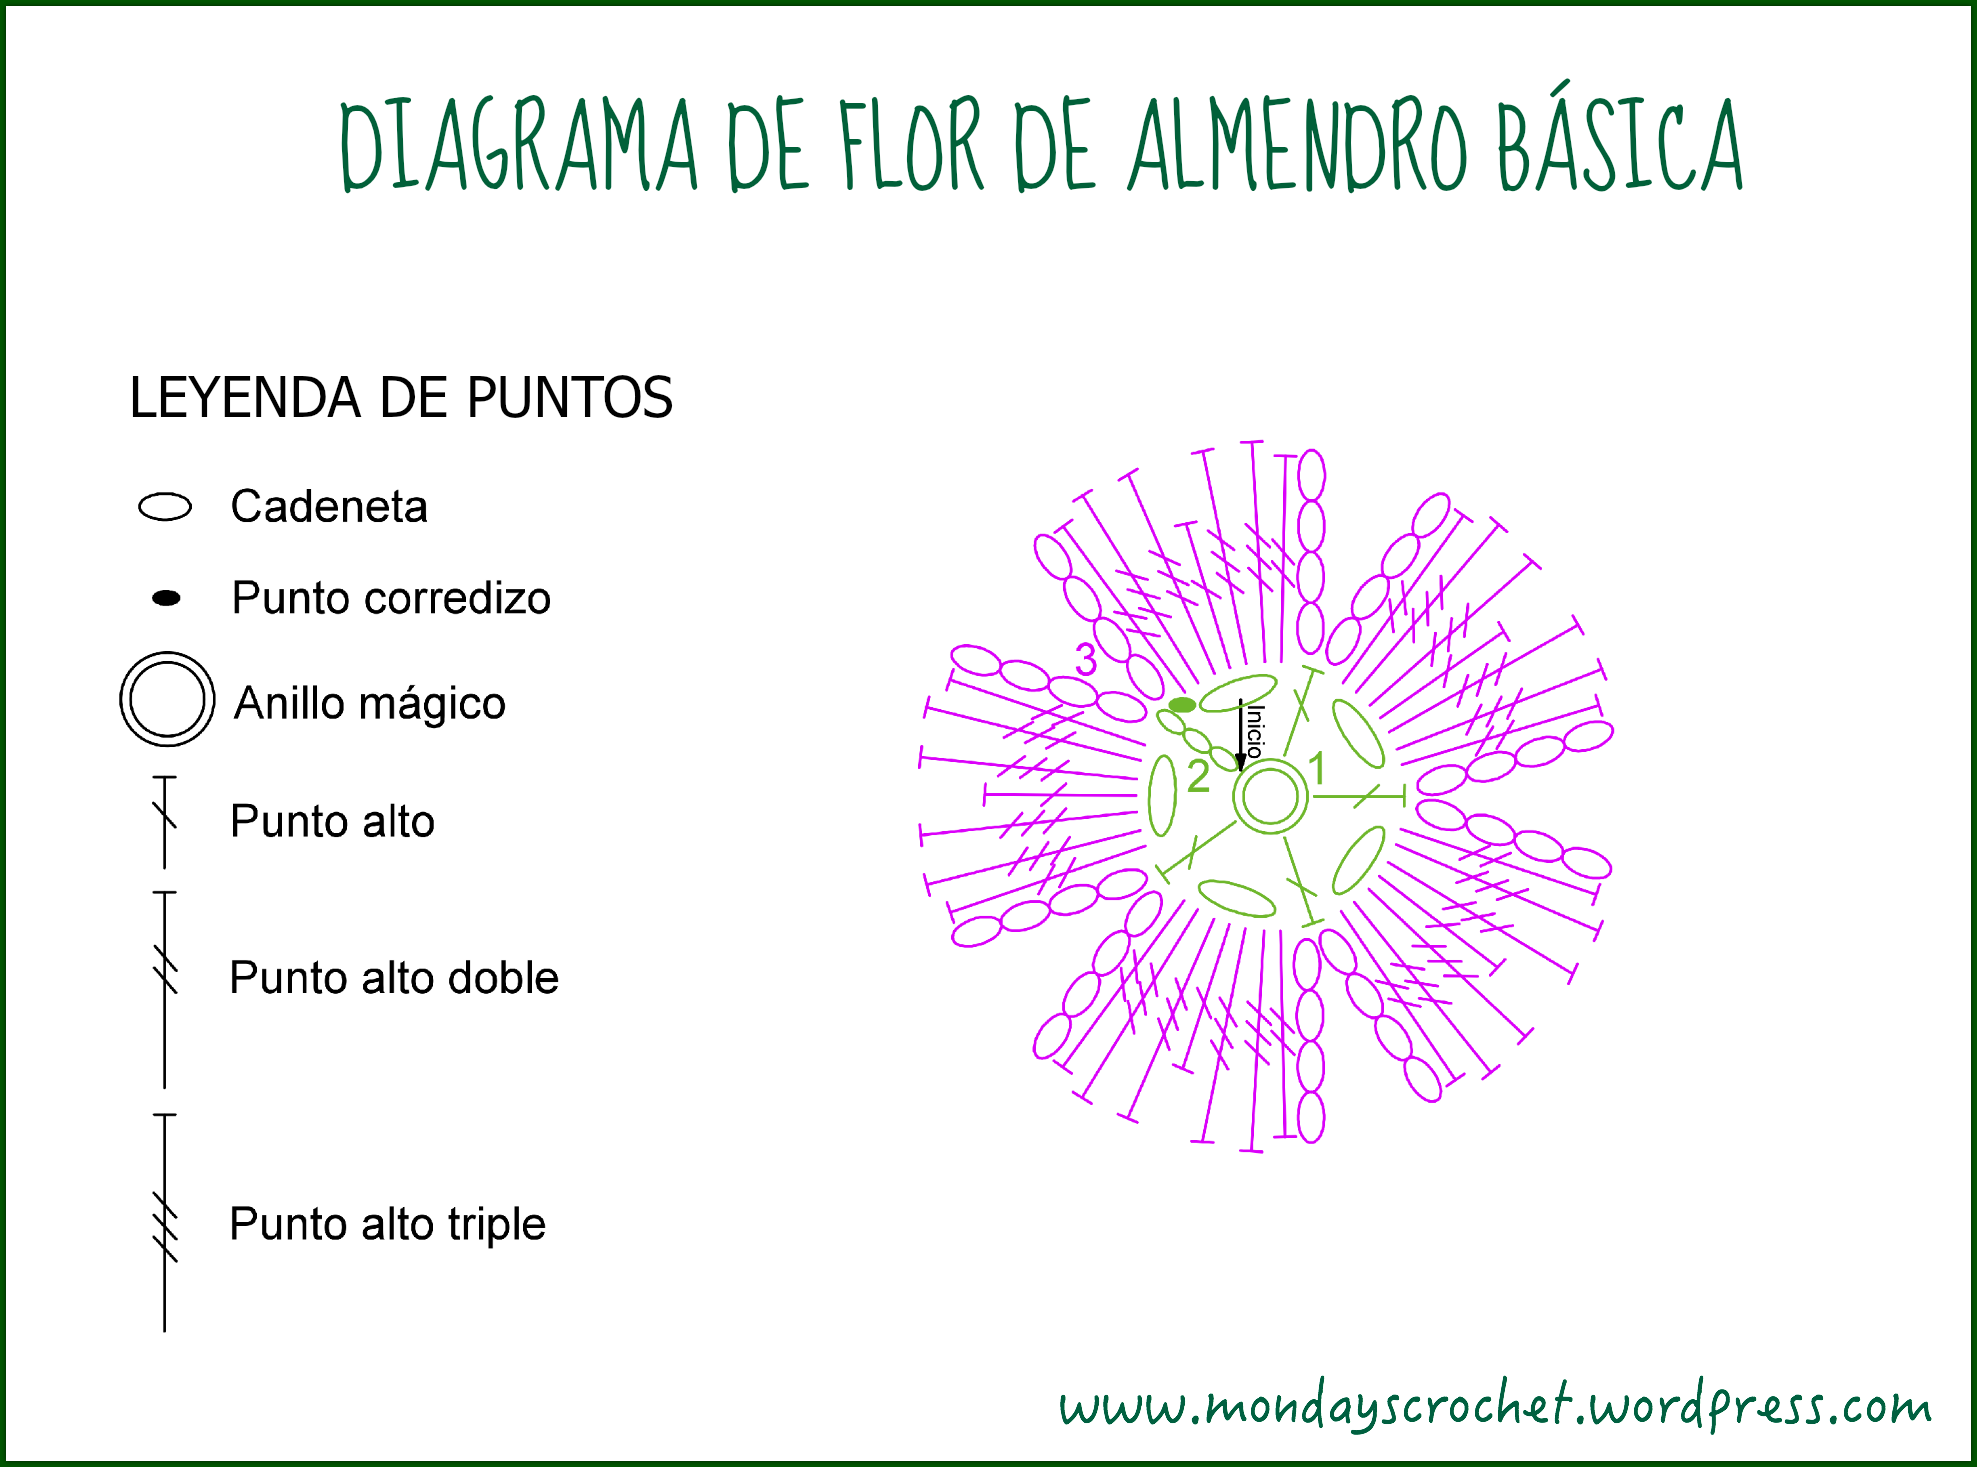
En color verde:
VUELTA 1: Hacer un anillo mágico. Podéis ver un vídeo tutorial en nuestro canal de YouTube.
VUELTA 2: Dentro del anillo mágico, tejer 3 c.a.d. de subida que es el primer p.a, 1 c.a.d., 1 p.a., 1p.a. Repetir 3 veces más hasta completar con 5 p.a. 5 c.a.d. Cerrar con 1 p.c. Cerrar el anillo mágico y rematar el hilo con una aguja de coser.
Cambiar a color blanco:
VUELTA 3: En cualquiera de los huecos de c.a.d. de la vuelta anterior, tejer 4 c.a.d. 1 p.a.d., 2 p.a.tr, 1 p.a. 2 p.a.tr. 1 p.a.d. y 4 c.a.d. Introducir el ganchillo en el hueco donde estamos haciendo este primer pétalo, soltar la hebra, introducir el ganchillo en el siguiente hueco, coger la hebra y sacarla para comenzar el segundo pétalo. Repetir hasta completar los 5 pétalos. Rematar el hilo con una aguja de coser.
For green color:
ROW 1: Make a magic ring. You can see the video tutorial at our channel on You Tube
ROW 2: Inside the magic ring, 3 ch (first dc),1 ch, 2 dc. Repeat 3 times and finish with dc, 5 ch, 1 sl st. Close the magic ring and finish off with a sewing needle.
For White color:
ROW 3: In any of the chain holds from the previous row, 4 ch, 1 tb, 2dtb, 1 dc, 2 dtb, 1 tb, 4 ch. Introduce the hook into the hole where we are making the first petal, release the thread, introduce the hook into the next hole, take the thread and and pull it out to start the second petal. Repeat until 5 petals are complete. Finish off with a sewing needle.
TUTORIAL PARA LA FLOR DE ALMENDRO CON PÉTALO PEQUEÑO / TUTORIAL FOR AN ALMOND FLOWER WITH SMALL PETAL
Para conseguir un efecto más real, hemos tejido algunas flores con uno o varios pétalos más pequeños.
To create a more realistic effect , we have made a few flowers examples with one or several smaller petals.

Las vueltas 1 y 2 son iguales a la flor básica. Solo varía la vuelta 3.
VUELTA 3: En cualquiera de los huecos de c.a.d. de la vuelta anterior, tejer 4 c.a.d. 1 p.a.d., 2 p.a.tr, 1 p.a. 2 p.a.tr. 1 p.a.d. y 4 c.a.d. Introducir el ganchillo en el hueco donde estamos haciendo este primer pétalo, soltar la hebra, introducir el ganchillo en el siguiente hueco, coger la hebra y sacarla para comenzar el segundo pétalo. Repetir hasta completar los 5 pétalos. Rematar el hilo con una aguja de coser.
First and second rows are the same tan in the basic flower. The only variation is row 3.
ROW 3: In any of the chain holds from the previous row, 4 ch, 1 tb, 2 dtb, 1 dc, 2 dtb, 1 tb, 4 ch. Introduce the hook into the hole where we are making the first petal, release the thread, introduce the hook into the next hole, take the thread and and pull it out to start the second petal. Repeat until 5 petals are complete. Finish off with a sewing needle.
TUTORIAL PARA LA FLOR DE ALMENDRO CON PÉTALO GRANDE / TUTORIAL TO MAKE AN ALMOND FLOWER WITH A BIG PETAL
Y en otras flores, hemos tejido uno o varios pétalos más grandes.
For the rest of the flowers we have made a few bigger petals.

Las vueltas 1 y 2 son iguales a la flor básica. Solo varía la vuelta 3.
VUELTA 3: En cualquiera de los huecos de c.a.d. de la vuelta anterior, tejer 5 c.a.d. 1 p.a.tr., 2 p.a.cuád, 1 p.a.d. 2 p.a.cuád. 1 p.a.tr. y 5 c.a.d. Introducir el ganchillo en el hueco donde estamos haciendo este primer pétalo, soltar la hebra, introducir el ganchillo en el siguiente hueco, coger la hebra y sacarla para comenzar el segundo pétalo. Repetir hasta completar los 5 pétalos. Rematar el hilo con una aguja de coser.
First and second rows are the same as in the basic flower. The only variation is row 3.
ROW 3: In any of the chain holds from the previous row, 5 ch, 1 tb, 2 dtb, 1 dc, 2 dtb, 1 tb, 5 ch. Introduce the hook into the hole where we are making the first petal, release the thread, introduce the hook in the next hole, take the thread and and pull it out to start the second petal. Repeat until 5 petals are complete. Finish off with a sewing needle.
DECORACIÓN DE LAS FLORES / FLOWERS DECORATIONS
Hemos pintado todas las flores con rotulador de color rosa fucsia y las hemos difuminado de dentro hacia fuera con agua y un pincel de cerdas duras.
We have painted all the flowers using a fuchsia pink pen and we blur the inside with water and a stiff brush.
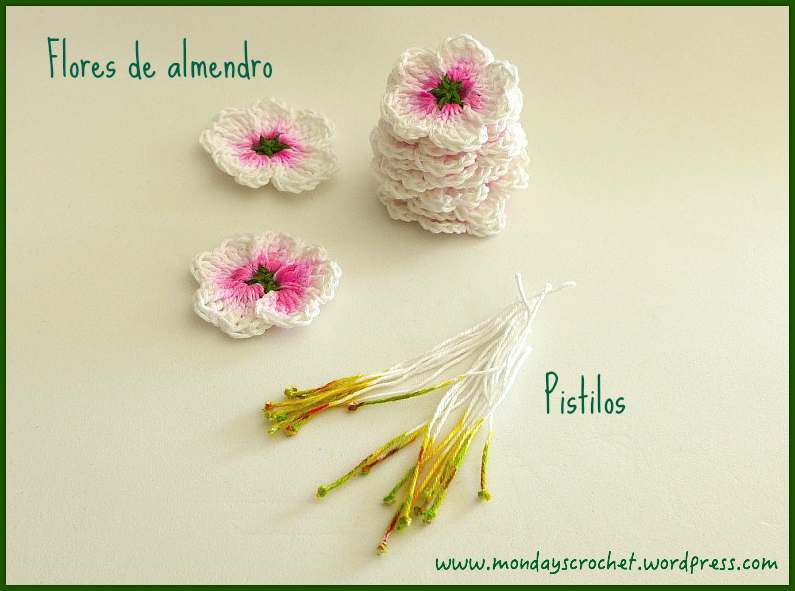
PISTILOS / PISTIL
Los pistilos son trozos de hilo de 8 cm con dos nudos en una de sus puntas, cortando el hilo sobrante y pintados con rotulador rosa fucsia, verde claro y amarillo.
Para prenderlos a las flores hemos utilizado una aguja de coser y los hemos rematado por la parte del revés.
Hemos utilizado 3 pistilos para cada flor.
The pistils are pieces of thread 8 cm long with two knots at one of its ends, cut the excess thread and paint with fuchsia pink, light green and yellow.
To pin them to flowers use a sewing needle and sew on the reverse side .
We used three pistils for each flower .
Ahora solo queda unir todas las flores a una rama y terminar de decorar nuestro centro primaveral.
Now we attach all the flowers on a branch and finish decorating our spring center.

Bonjour, j ai une autre question : avec les pistils cela fait beaucoup de fils ! Est ce que vous les rentrer dans les rangs avec une aiguille à coudre ou avez-vous une autre astuce😉
Bonne journée à vous 🌞
Me gustaMe gusta
Bonjour, merci pour ces magnifiques fleurs d amandier! J ai terminé ma 1er fleur avec succès 😊
Comment les fixez-vous sur la branche?
Merci d avance pour votre réponse 🙏🌞
Me gustaMe gusta
Pingback: Flores de almendro [Crochet Intermedio] > Tejidos Crochet
Me encanta pero no entiendo muy bien la vuelta 3 despues del primer punto y seguido cuando dice introducimos. ….
Me gustaMe gusta
Se trata de esconder el hilo en la cadeneta de bajada de cada pétalo para que no se vea un punto corredizo. Así la flor queda más perfecta.
Tejes la cadeneta de bajada, introduces el ganchillo en el espacio de la vuelta anterior, sueltas el hilo del ganchillo, lo introduces por el siguiente hueco, recoges la lazada y comienzas la cadeneta de subida del nuevo pétalo.
Espero que lo consigas!!
Me gustaMe gusta